The last bottle of one SKU has left the filler, but the product change is not finished. Liquid may still sit inside hoses, valves, pumps, manifolds, and nozzle tips while the next formula waits beside the line. In multi-SKU production, that hidden material can turn a routine switch into the longest stop of the shift. A useful changeover plan for liquid filling equipment must control the complete product path, not only the visible machine surface. It should also separate cleaning work from bottle-format adjustments, so every delay has a clear cause and a practical improvement route.
Operational focus: This guide covers product-contact cleaning, liquid change, and SKU restart at the filling station. Bottle handling, full-line changeover, and unconfirmed CIP or SIP functions remain outside this scope.
Map the Product-Contact Path
A changeover starts before the final bottle leaves the filler. The production record should show where the current product enters, travels, divides, meters, and exits. Without that map, cleaning usually follows what is easy to see rather than what still holds liquid.
Begin at the supply vessel or transfer connection. Then follow every hose, pipe, filter, pump, meter, manifold, valve, return line, and filling nozzle. If a branch can trap product, mark it even when that branch is rarely used.
Build a path map that matches the actual machine
A generic process diagram is not enough for daily work. The useful version should match the installed routing and identify removable parts, drain points, low points, capped branches, and direction changes. Clear names also prevent confusion when several hoses look alike.
Next, divide the path into cleaning zones. One zone may cover the supply hose and pump, while another covers the manifold and nozzles. This division helps teams isolate a failed rinse, trace residual color, and avoid repeating the entire procedure without evidence.
Record these points on the path map:
- Every product inlet, outlet, recirculation route, and unused branch.
- Pump chambers, meter bodies, valve cavities, seals, and nozzle shutoff areas.
- Connections that must be opened, capped, removed, or visually checked.
- The lowest practical drain point for each section.
- The sampling point used to judge rinse condition or product transition.
Metering technology changes the map. A flow meter filling machine should be reviewed around the product route through the meter, valves, manifold, and nozzles. The exact cleaning method still depends on product behavior, wetted materials, and the confirmed machine design.
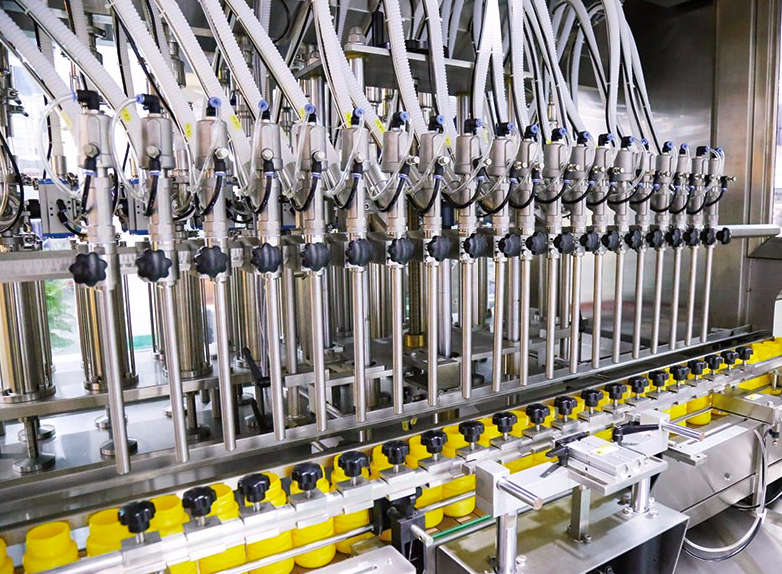
A close equipment view makes hoses, filling heads, connections, and adjustment points easier to place on the product-path map.
Separate Cleaning From Mechanical Format Change
A production stop often gets reported as one changeover time. That number hides two different jobs. Product change concerns draining, flushing, washing, inspection, and liquid-path preparation, while bottle-format setup belongs in a separate filling-station checklist.
Separating the two creates a better improvement plan. A slow cleaning cycle will not improve through extra bottle guides. Likewise, a nozzle-height adjustment problem will not disappear after revising the rinse sequence.
Use a task clock, not a single stopwatch
Track when each liquid-path activity begins and ends at the filler. Before the current SKU finishes, clean hoses, verified seals, caps, and inspection tools can be staged outside the active product area. Draining, opening connections, and reassembly begin only after the product path is safely isolated.
A simple timeline exposes waiting. For example, the machine may sit empty while a cleaning tool arrives, a replacement gasket is found, or approval is requested. Those delays are planning gaps rather than unavoidable sanitation time.
| Changeover activity | Record separately | What the record reveals |
|---|---|---|
| Drain and isolate | Start and finish time | How quickly the product path releases material |
| Clean and inspect | Active work time | The true cleaning burden by zone |
| Wait for parts or approval | Idle time | Planning delays that should not be counted as cleaning |
| Reassemble and restart | Setup and first-good-fill time | How repeatable the recovery process is |
A practical observation: the quiet minutes often matter most. If the filler is already drained but the correct seal set is still in storage, the stoppage is no longer a cleaning problem. Naming that wait correctly makes the next changeover easier to improve.
Product-contact work
Drain product, open defined connections, remove contact parts, clean zones, inspect residues, reassemble, and prepare the new liquid.
Separate format work
Record bottle-handling and fill-target adjustments in the dedicated format checklist, rather than hiding them inside cleaning time.
The boundary also improves training. Cleaning instructions can focus on residue control and safe reassembly. The separate format procedure can then control container settings without expanding this liquid-change workflow.
However, the two streams must reconnect before release. A nozzle installed at the wrong height can create splashing during the next SKU. A correct format setup cannot compensate for a seal fitted incorrectly after cleaning.
Product Family Grouping and Changeover Sequence
SKU order can reduce cleaning demand before any machine modification occurs. The practical question is not simply which product sells most. Instead, the sequence should consider color, fragrance, viscosity, active ingredients, residue behavior, and internal compatibility rules.
Products with similar behavior may form a campaign family. For instance, a transition between two compatible clear liquids may be easier to manage than a move from a dark, strongly scented product to a clear neutral one. That example remains a planning principle, not a universal release rule.
Picture the difference at the nozzle bank. A faint tint left before a darker compatible product may be easy to detect and manage under the approved procedure. The same tint before a clear SKU becomes an immediate release concern. Production order therefore changes the work that follows, even when the machine itself remains unchanged.
Create a changeover risk matrix
List the current SKU down one side and the next SKU across the top. Then classify each transition using the site’s own cleaning and compatibility requirements. A high-risk direction may require a deeper clean, while the reverse direction may not carry the same risk.
This directional view matters. Moving from uncolored product to colored product differs from moving back to uncolored product. Likewise, a low-fragrance formula followed by a strong fragrance creates a different concern than the opposite order.
A useful sequence review compares:
- Visual carryover: clear, light, dark, opaque, or strongly colored products.
- Odor carryover: neutral, mild, and persistent fragrances.
- Flow behavior: thin, foaming, stringing, or high-viscosity products.
- Formula compatibility: transitions that the site permits, restricts, or separates.
- Campaign length: enough volume to justify the cleaning and setup burden.
Urgent orders sometimes break the preferred sequence. When that happens, the schedule should show the additional cleaning burden rather than hiding it inside routine downtime. This visibility supports better order decisions and more realistic production promises.
Dedicated contact-part sets may also help certain transitions, subject to product compatibility and project confirmation. Even then, storage, identification, and cleaning status need control. A spare set creates value only when its condition and SKU assignment remain clear.
Drainability, Residual Product and Hard-to-Clean Points
The final saleable bottle rarely empties the full product route. Material can remain below a tank outlet, inside a hose sag, behind a closed valve, around a seal, or within a manifold branch. Thick products make this loss visible, while clear liquids can leave less obvious residue.
Drainability describes how readily the path releases product through planned outlets. Good drainability does not prove cleanliness. However, it reduces the amount that cleaning must displace and makes the remaining risk easier to locate.
Walk the route while it still contains product
A dry machine inspection can miss the places where liquid settles during operation. During a controlled review, observe hose slopes, low sections, valve orientation, pump position, and nozzle behavior. Photographs and marked drawings can then support a redesign discussion.
Residual product also affects yield reporting. Material sent to drain, collected for controlled recovery, or discarded during transition should be measured under the site’s procedure. Once quantified, the loss can be compared against the cost of different routing or changeover options.
A gear pump filling machine requires a product-specific review of the pump chamber, connections, downstream valves, hoses, and nozzles, with viscosity, cleaning chemistry, and wetted-part compatibility considered in the final procedure.
Hard-to-clean points should be ranked, not merely listed. Give priority to locations that hold more residue, cannot be inspected easily, or repeatedly cause restart failure. That ranking directs engineering effort toward the constraints with the greatest operational effect.
Use the residue pattern to choose the next action
Residue near one nozzle may indicate a local issue. Residue across every filling position may point toward the common manifold or upstream supply path. This pattern-based reasoning avoids replacing parts before the source is understood.
Likewise, a persistent odor with no visible color needs a different response from visible particles. The verification method should match the risk being controlled. A single visual check cannot answer every cleaning question.
Quick-Change Parts and Repeatable Setup Records
Fast changeover is often reduced to clamps, knobs, and tool-free adjustments. Those features can save motion, but they do not guarantee a correct restart. Speed becomes reliable only when each part has a defined position, clean status, identity, and inspection step.
A quick-release connection can shorten removal time. However, it also creates a sealing surface that must be checked during reassembly. Missing, damaged, misplaced, or incompatible seals can turn saved minutes into a longer production interruption.
Design the part-handling route around the work
Removed parts should not travel through an improvised path. A defined route from removal to cleaning, inspection, drying, storage, and return lowers mix-up risk. Covered containers and clear identification also protect cleaned components before installation.
Storage deserves the same attention. If one nozzle set sits beside another without clear status, the next shift may repeat inspection or install the wrong item. Visual controls should distinguish clean, awaiting inspection, released, and out-of-service parts.
A repeatable setup record can include:
- SKU name, revision, product family, and approved changeover direction.
- Required contact-part set and seal identification.
- Hose route, valve position, drain point, capped branch, and active nozzle path.
- Cleaning-zone release status and any controlled exception.
- Photographs of correct contact-part assembly and common wrong positions.
- Transition-sample checks and the liquid-path approval point before normal filling.
Setup records should capture conditions, not just numbers. Product temperature, foam behavior, or supply pressure can change the result even when the recipe remains unchanged. A short note beside the setting can explain why an adjustment was made.
Version control matters as well. An old photograph or handwritten setting can quietly reverse a successful improvement. One controlled record should identify the current setup, while obsolete copies should leave the work area.
Verification Before Restarting the Next SKU
A clean-looking filler is not automatically ready. Restart verification should confirm both cleaning and assembly. It should also show that the new product reaches every active filling position under controlled conditions.
The exact acceptance method depends on the product, internal quality system, and applicable requirements. Still, a practical release sequence can separate visual condition, assembly checks, transition samples, and fill-performance checks. This separation makes a failure easier to trace.
Check from the inside out
Begin with the released cleaning record and the correct parts. Then confirm clamps, seals, caps, hose routes, valves, guards, and nozzle positions. A line walk should follow the product direction so no connection is skipped.
Next, introduce the new product according to the approved process. Early output may be held as transition material until the defined acceptance point is reached. Samples should cover active nozzles rather than relying on one convenient filling position.
Confirm cleaning status, drainage, inspection, and documented exceptions.
Confirm parts, seals, hose routes, valves, nozzles, and guards.
Hold initial output until the defined release checks are complete.
Review filling behavior across positions before normal production.
A restart check should also watch for foam, dripping, stringing, air pockets, delayed shutoff, or uneven flow. These signs may relate to product behavior, trapped air, assembly, supply condition, or settings. Recording the pattern provides more value than simply adjusting until the symptom disappears.
If a fault appears, isolate its stage. A residue failure belongs to the cleaning review. A leak at a reopened connection belongs to reassembly. A stable path with inconsistent output requires a separate filling and metering diagnosis.
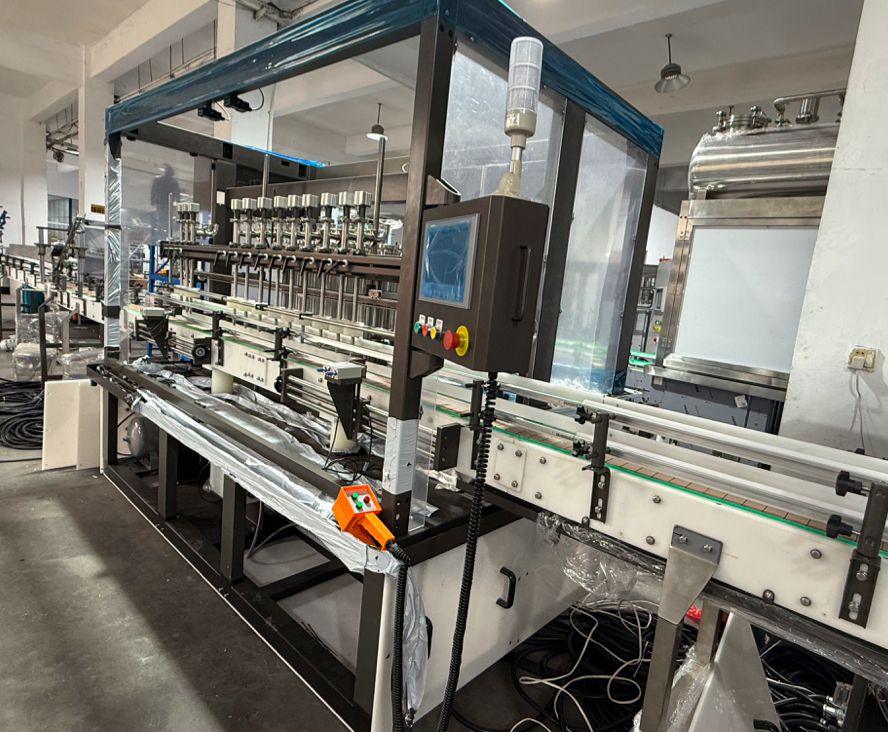
During restart, the review follows the active filling positions, bottle transfer, nozzle behavior, and recorded control settings.
Information for a Multi-SKU Solution
A useful equipment discussion needs more than a product name and target speed. Multi-SKU filling depends on the hardest transition, the cleaning limit, the bottle range, and the time available between campaigns. Those inputs should be compared before a filling category is selected.
Start with the SKU list and the planned running order. For each product, note appearance, fragrance, viscosity behavior, foam tendency, particles, temperature condition, and any internal compatibility restriction. Actual samples should support the discussion whenever feasible.
Submit the changeover case, not a catalog request
The cleaning requirement should state what must be removed and how release is judged. It should also identify the permitted cleaning method, available utilities, drainage limits, and any restricted chemistry. CIP or SIP capability should never be assumed without a confirmed project configuration.
Allowed downtime changes the design discussion. A short window may favor staged parts, easier access, fewer connections, or parallel preparation. A longer window may permit a different operating method, though quality and repeatability still matter.
Prepare these project inputs:
- Complete SKU list and preferred production sequence.
- Representative liquid samples and known product-handling concerns.
- Current cleaning procedure, release requirement, and permitted utilities.
- Measured changeover timeline, including waiting and approval time.
- Allowed downtime for routine and difficult product transitions.
- Bottle drawings or samples, plus fill-volume range by SKU.
- Photos or drawings of the available product-supply and filling area.
The comparison can then focus on product-path access, drainage, metering route, removable parts, setup repeatability, and restart testing. This approach creates a technical basis for reviewing linear, gear-pump, and flow-meter filling categories without treating one technology as universally suitable.
Representative trials should use difficult transitions, not only the easiest product. A colored or strongly scented SKU, a high-viscosity product, or a foaming formula may reveal issues that a clear, free-flowing liquid cannot show. The final test plan should reflect the actual production risk.
| Production constraint | What deserves comparison |
|---|---|
| Frequent formula changes | Product-path access, removable parts, cleaning zones, and recipe recovery |
| Persistent or high-viscosity residue | Drainability, hose routing, pump chambers, valve cavities, and low points |
| Short production campaigns | Part staging, waiting time, first-good-fill recovery, and transition loss |
| Strict restart approval | Sampling access, inspection points, assembly records, and release sequence |
Related Filling and Changeover Guides
These guides continue the decision process without repeating the cleaning workflow covered above.
Bottle Filler Setup Checklist
Separate bottle-size and fill-volume adjustments from product-contact cleaning work.
Automatic Filling Route Selection
Compare piston, gear-pump, flow-meter, and weighing routes by production need.
Linear vs Rotary Filling Machines
Compare floor space, changeover access, production rhythm, and line planning.
Turn Changeover Loss Into a Testable Equipment Brief
The strongest improvement plan starts with the hidden product path and ends with a controlled restart. It distinguishes cleaning from mechanical setup, schedules compatible product families where permitted, and records the settings that make the next run repeatable.
Before requesting a configuration, complete three practical actions:
- Measure: time each drain, cleaning, inspection, reassembly, setup, and approval step.
- Compare: rank SKU transitions by residue, color, odor, viscosity, and cleaning difficulty.
- Test: use representative products, bottles, fill volumes, and the hardest planned transition.
Send the project inputs listed above to Runtech for a configuration review. They allow the discussion to focus on the product-contact route, contact-part strategy, and sample-testing plan for the proposed liquid filling equipment.
| Submit Multi-SKU Project Data → | Review Linear Filling Categories → |
Frequently Asked Questions
What filling-machine structure is easier to clean during multi-SKU production?
Look for a product path that can be mapped, drained, accessed, inspected, and reassembled consistently. Clear low points, accessible contact parts, controlled connections, and fewer unnecessary branches make residue easier to locate and remove. The final choice should still match the actual formulas, cleaning method, and wetted materials.
How do you identify the hardest SKU changeover on a filling line?
Compare transitions by direction, not only by product family. Dark-to-clear, strong-fragrance-to-neutral, high-viscosity-to-thin, or residue-prone-to-sensitive products may create very different cleaning burdens. Use actual changeover records, transition loss, inspection results, and restart delays to rank the most difficult cases.
Does fast changeover only mean quick-change mechanical parts?
No. Quick-release parts can reduce removal time, but total changeover also includes draining, cleaning, inspection, staging, reassembly, transition testing, and approval. The better target is a repeatable first-good-fill recovery time, not simply the fastest clamp or adjustment.
When should dedicated product-contact parts be considered?
Dedicated sets deserve review when the same difficult transitions repeatedly consume cleaning time or create residue and compatibility concerns. Compare the time saved against part cost, storage space, identification control, cleaning status, and the frequency of those changeovers before making them part of the standard setup.