
Changing a closure rarely means changing only the final tightening head. In practice, a bottle capping machine must control how the cap is sorted, guided, presented, held, seated, and finally secured. A round screw cap may move cleanly through one setup, while a press closure, pump, or trigger can change the handling problem much earlier in the process. The useful question is not simply whether several closure types can run on one line. It is which mechanical parts and control settings must change when the closure changes.
Quick answer: Compare every closure by the station it changes: feeding, transfer, bottle control, placement, engagement, and changeover. Geometry usually determines whether a physical change part is needed; settings such as height, timing, pressure, grip, and tightening are confirmed only after the installed hardware can control the new format.
Group Closures by the Movement They Require
Two closures can look similar on a specification sheet yet behave differently once they enter an automated line. A threaded closure depends on a square thread start and controlled rotation. A snap closure depends on accurate placement followed by axial pressing. Pumps and triggers add tubes, projecting actuators, and offset bodies that can affect sorting and transfer before the tightening station is reached.
That is why closure classification should start with movement and control rather than appearance alone. A cap may fit the neck perfectly by hand yet rotate inside a guide, bounce during release, or reach the bottle off-center. A successful hand fit confirms the package interface; it does not prove automatic handling compatibility.
Four questions expose most setup differences
- How does the closure become secure? Rotation, pressing, or a combination of movements.
- How regular is the outer geometry? A symmetrical round cap behaves differently from an offset trigger body.
- What projects beyond the closure body? Dip tubes, nozzles, levers, hinges, and tamper features can change clearance.
- Does orientation matter? Some formats need only correct placement; others need controlled presentation or a defined finished direction.
For a multi-SKU project, describe what each closure asks the machine to do instead of saying that one line must handle “four cap types.” That distinction reveals which stations can remain common and which may need dedicated format parts.
Closure-to-Setup Matrix: What Usually Changes?
The comparison below separates fundamental process changes from minor format adjustments. It is a planning guide rather than a universal equipment specification. The final configuration still depends on the supplied bottle, neck finish, closure geometry, placement method, and machine architecture.
Screw caps
Main engagement: Threaded rotation.
Main risk: Tilted placement, poor thread start, cap slip, or bottle rotation.
Likely changes: Guide height, gripping contact, bottle restraint, release timing, and tightening settings.
Press or snap closures
Main engagement: Axial pressing or snap engagement.
Main risk: Off-center seating, incomplete engagement, or bottle deformation under load.
Likely changes: Placement guides, vertical supports, press tooling, working height, timing, and press movement.
Pump closures
Main engagement: Tube entry followed by threaded tightening in many formats.
Main risk: Tube interference, cap tilt, unstable transfer, or contact with a weak actuator surface.
Likely changes: Chutes, tube guides, transfer parts, contact parts, feeder coordination, and orientation controls where required.
Trigger closures
Main engagement: Tube entry and threaded tightening with an asymmetric upper body.
Main risk: Handle or nozzle interference, lost feed orientation, off-center tube entry, or inadequate side clearance.
Likely changes: Orientation, chute clearance, transfer and holding parts, release timing, height, and tightening settings.
A move from one round screw cap to another may mainly affect contact height and guides. A move from a round cap to an asymmetric trigger can change several upstream stations at once. That pattern matters more than the cap name alone.
Screw Caps and Press Closures Need Different Starting Conditions
For screw caps, thread start comes before torque
Screw-cap defects often get described as torque problems because the visible result appears after tightening. Many failures begin earlier. The cap may arrive tilted, the bottle may rotate under load, or the closure may touch the neck before its thread is ready to engage.
A cap that enters squarely gives the tightening mechanism a predictable starting point. An angled cap can follow the wrong thread path and still appear normal for a moment. Cross-threading should therefore trigger an alignment review before the tightening setting is changed. Check release position, bottle centering, neck condition, guide height, and cap stability.
Grip depends on the real contact surface
A smooth skirt, heavily ribbed skirt, short cap, and tall flexible closure do not create the same gripping condition. Sample evaluation must include the surface that the wheels or capping head actually touches. Too little contact allows slipping; excessive side force can deform a flexible cap or disturb the bottle. Stable contact is more useful than simply increasing pressure.
Bottle restraint belongs in the same diagnosis. If the bottle turns with the closure, the capper loses a stable reference. Tall containers may lean when side contact is poorly positioned, while soft bottles can deform under excessive restraint.
For press and snap formats, placement comes before force
Press and snap closures remove the thread-start problem, but they make axial alignment more important. The cap should already be centered when pressing force begins to rise. Otherwise, the press station amplifies a placement error instead of completing a controlled seating movement.
The container structure underneath the press point also matters. Bottle-base condition, wall stiffness, shoulder shape, and the supporting surface can change the result. A flexible bottle may compress or move before the closure fully engages. Increasing force is not automatically the answer; stable placement and vertical support may correct the real cause.
Check the first point of instability
- For random loose screw caps, watch whether the bottle moves during tightening.
- For tilted or cross-threaded caps, observe the closure before final rotation starts.
- For incomplete snap engagement, inspect centering and support before increasing press force.
- For a cap seated on one side only, compare the full circumference and verify the bottle remains vertical.

A complete machine view helps connect cap feeding, bottle restraint, closure presentation, and final engagement when screw and press-in formats are being compared.
| View Linear Servo Capping Machine → |
For projects centered on rotating screw closures, the 4 wheels capping machine category provides one relevant equipment direction to compare. Compatibility still depends on the bottle profile, closure geometry, placement method, and required production arrangement.
Pump and Trigger Closures Change the Upstream Handling Problem
Pumps and triggers are not difficult only because they look different from round caps. Their larger, less symmetrical envelope changes feeding clearance, transfer stability, tube entry, release timing, and orientation. A threaded neck connection may remain unchanged while the surrounding handling system changes substantially.
- The feeder may need to control an asymmetric body instead of a compact round cap.
- The chute needs clearance for the actuator, trigger body, nozzle, and production-length tube.
- The release point must keep the closure stable while the tube approaches the bottle opening.
- Bottle centering becomes critical for clean tube entry.
- Feed orientation may be required before placement.
- A defined finished direction must be specified separately when the completed package needs it.
Tube flexibility should be evaluated with representative components. A carefully straightened sample may enter easily by hand, while production parts can carry curvature from storage and packing. Matching thread dimensions alone does not prove that an existing cap path will handle the complete pump or trigger assembly.
Feed orientation and final orientation are different requirements. A trigger may need to face one direction to pass through the feeder and transfer system, yet finish in another direction after threaded tightening. If the final nozzle or actuator must face a label, tray, carton, inspection camera, or packing station, that result needs its own acceptance condition.
For a deeper comparison of these two closure families, review the existing guide to pump cap vs trigger cap capping machine differences. For projects that need automatic sorting and presentation, the pump / trigger cap feeding category provides the relevant next equipment path.
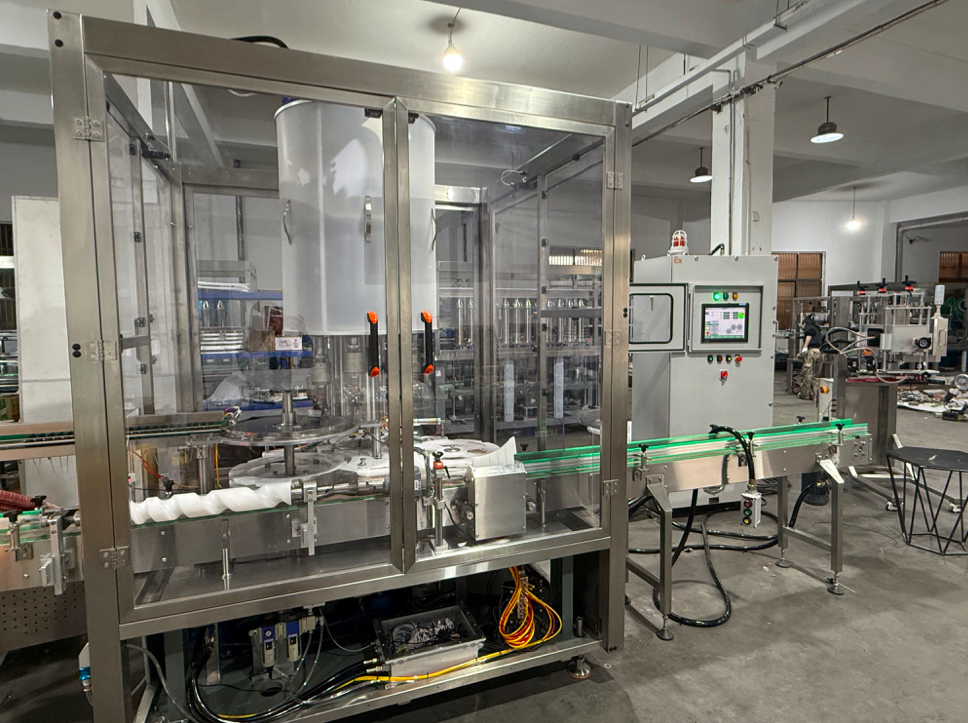
When closure geometry changes, feeding, presentation, bottle control, transfer clearance, and tightening must be reviewed as one process.
| View Rotary Capping Machine → |
Change Parts vs Parameter Changes
Multi-closure projects become easier to manage when every setup change is classified. Geometry differences belong to tooling or change parts. Process differences that remain inside the installed machine’s adjustable range may be handled through documented settings. Most real format changes use both.
Trace the closure from bulk supply to final engagement
The capping head should not receive all the attention while upstream handling remains undefined. Follow the closure through feeding, orientation, chute travel, release, bottle presentation, holding, engagement, and discharge. At every point, ask whether the existing setup can still control the new geometry.
A chute can guide a closure through a straight section and still allow it to rotate or catch at a bend. A compact screw cap may tolerate a different handoff from a long pump assembly. When geometry changes the physical handoff, a recipe change cannot replace the guide, release component, or support that is missing.
Typical physical changes to review
- Cap chute or rail sections.
- Closure nests, transfer guides, or release components.
- Bottle side guides, neck guides, holders, pucks, or supports.
- Capping contact elements or pressing tools.
- Tube guidance for pump or trigger formats.
- Orientation components for asymmetric closures.
Typical parameter changes may include working height, gripping condition, guide position, sequence timing, cap-release timing, feeder coordination, sensor position, pressing movement, and rotational settings. Exact values should come from real sample testing. Every recipe also needs to remain linked to the correct physical tooling.
Classify every station as common, adjusted, or dedicated
A change-part matrix should identify this status for every major station. It exposes hidden changeover work before equipment approval and prevents the broad phrase “adjustable machine” from hiding format-specific requirements. Common tooling is valuable only when it controls every format reliably; excess clearance can make a nominally universal guide less stable than a dedicated part.
Match the starting equipment path to the production condition
Sample-Test Checklist for a Multi-Closure Setup
A useful compatibility test reproduces the complete closure path. Manually placing one ideal cap beneath the final head proves little about automatic feeding, orientation, transfer, or bottle presentation. When a failure appears, record where the process first becomes unstable rather than only describing the finished rejected package.
1. Prepare complete format sets
Pair every planned closure with its actual bottle. If the same cap runs on several bottles, keep those combinations separate because bottle geometry changes restraint, alignment, and working height. Pumps and triggers should include production-length tubes in normal supply condition, not only carefully straightened demonstration samples.
2. Test feeding and transfer before engagement
Watch for overlapping, interlocking, reversed presentation, unexpected rotation, or stalls at guide transitions. Observe the exact moment the cap leaves the guide. If the feed path is unstable, changing the final tightening or pressing setting will not remove the underlying cause.
3. Inspect placement separately
Before judging final engagement, inspect where the closure sits as it meets the bottle. Look for tilt, bounce, late release, tube interference, and inconsistent centering. The final station should complete engagement, not rescue an unstable placement event.
4. Apply the closure-specific acceptance check
For screw caps, observe thread start, cap grip, bottle movement, and the finished tightening condition. For press closures, inspect centering, bottle support, and seating around the full circumference. Pump and trigger trials should add tube entry, upper-body clearance, and separate feed-orientation and finished-direction checks where relevant.
5. Test the changeover, not only steady production
Stable output after extensive expert adjustment does not prove a repeatable multi-format setup. Include removal, installation, documented adjustment, recipe selection, and restart for the next closure. Compare the first group of packages with the approved reference. If acceptable production still depends on undocumented fine adjustment, the changeover procedure is incomplete.
6. Include stop-and-restart conditions
Material replenishment, upstream pauses, inspections, and routine stops can change spacing around the feeder and transfer system. Inspect the first closures after restart. A setup that remains stable only during uninterrupted flow may still create avoidable problems in daily production.
Record the failure mode, not only “pass” or “fail”
- Feeding instability or incorrect orientation.
- Chute, transfer, or upper-head interference.
- Off-center placement or poor thread start.
- Bottle rotation, tilt, vertical movement, or deformation.
- Incomplete press seating or tube-entry interference.
- Incorrect finished closure position after restart.
What to Confirm Before Approving a Multi-Closure Project
An equipment brief should describe the complete packaging formats rather than only the machine category or cap diameter. Connect each closure to its bottle, placement method, feeding method, direction requirement, and planned production arrangement. This makes the hardest format visible early.
Cap diameter cannot describe tube length, skirt flexibility, upper-head projection, bottle stability, or the relationship between the neck and closure. Drawings are useful for dimensional review, but representative physical samples reveal movement and variation that static dimensions may not show.
Prepare these project inputs
- Complete bottle-and-closure format list.
- Representative bottles, closures, and drawings when available.
- Manual or automatic cap-placement and feeding requirements.
- Tube length and normal tube condition for pumps and triggers.
- Feed-orientation and finished-direction requirements, stated separately.
- Target output for every important format and normal changeover frequency.
- Known future SKUs that may affect change-part planning.
- Available layout plus upstream and downstream interface information.
When several formats share one line, identify the routine format, the most difficult package, and any occasional special closure. That distinction prevents an easy sample from defining a system that later fails on the longest tube, softest bottle, widest trigger head, or strictest orientation requirement.
Turn Closure Compatibility Into a Testable Setup Plan
Before requesting a final configuration, complete three practical actions:
- List: connect every closure to its bottle, placement method, feeding method, direction requirement, target output, and planned SKU.
- Compare: mark every major station as common, adjusted, or dedicated, then link the required settings to the correct tooling.
- Test: run representative samples through feeding, transfer, placement, holding, engagement, changeover, and restart conditions.
Send the format list, available drawings, real bottles and closures, placement and feeding requirements, direction requirements, and target output. Runtech can then review where one setup remains practical and where dedicated handling or change parts should be evaluated.
| Submit Closure Samples & Project Data → | Review Capping Categories → |
Frequently Asked Questions
Which closure changes usually need dedicated change parts?
A dedicated part becomes likely when the new closure cannot remain controlled inside the existing physical range. Examples include an offset trigger that interferes with the chute, a long tube that needs guidance, a press closure that needs another support or press tool, or a bottle that cannot remain centered inside the current holder. The decision should be based on repeated sample performance, not diameter alone.
Can recipe settings replace a chute, holder, or pressing-tool change?
Only when the installed hardware already controls the new format. Height, timing, grip, pressure, and tightening settings cannot correct missing clearance, an unsupported bottle, an unstable handoff, or a contact surface that does not match the closure. Confirm geometry first, then document the settings that belong with the approved tooling.
How should a press-closure trial differ from a screw-cap trial?
A screw-cap trial concentrates on placement, thread start, bottle restraint, cap grip, and final tightening. A press-closure trial places more weight on centering before force rises, vertical bottle support, body deformation, and complete seating around the circumference. Both trials should isolate placement from final engagement so the last station is not used to hide an earlier alignment error.
What must be documented before releasing a closure changeover?
Document the installed change parts, adjustment positions, selected recipe, approved reference package, acceptance checks, first-good-package result, and restart condition. The record should also identify the first failure point if a trial does not pass. A setup that works only after undocumented fine adjustment is not yet a repeatable production changeover.
The right multi-format setup is the one that controls every approved closure through feeding, transfer, placement, engagement, and restart—not the one that fits the widest list of cap diameters on paper. A complete format list and representative samples give the technical review a practical basis for matching each package with the appropriate capping configuration.