

A format change can look straightforward while the machine is stopped. The new bottle fits between the rails, the closure enters the chute, and the capping unit still appears to have adjustment room. Once several packages begin moving together, however, small setup errors become easier to see: a neck shifts under load, a cap arrives slightly off-center, or a setting that worked during jogging becomes unreliable in continuous operation.
A repeatable bottle capping machine changeover therefore involves more than changing height or width. The practical task is to control the complete relationship between bottle handling, cap feeding, placement, tightening, timing, trial runs, and the settings recorded for the next production change.
Changeover focus: This checklist stays at the capping station. It covers bottle holding, cap feeding, chute and placement changes, capping tooling, height, timing, trials, change parts, and sign-off. Filling-machine setup and complete production-line changeover planning remain separate tasks.
Build a Bottle-and-Cap Changeover Matrix
A reliable changeover starts before any handwheel moves. Instead of treating every SKU as an unfamiliar setup, record the bottle, closure, and approved mechanical combination in one format matrix. When the same package returns, the setup starts from a known reference rather than from memory.
The matrix does not need to become a full packaging specification. It only needs the details that change how the package behaves at the capping station. Overall bottle height matters, for example, but neck position, shoulder profile, base stability, sidewall stiffness, and closure shape may have a greater effect on actual capping behavior.
Separate bottle behavior from cap behavior
Two containers with almost the same body width can behave very differently. A rigid round bottle may stay stable with simple side guidance. A thin-wall oval bottle can twist when the tightening mechanism begins applying load, even though both bottles passed easily through the same opening during manual setup.
Closure geometry creates a separate set of questions. A short round screw cap mainly needs controlled feeding, centered placement, and suitable tightening contact. A taller or asymmetric closure may also require orientation control, different chute clearance, and more space around the capping mechanism.
This checklist is most useful when an existing capping process moves between bottle-and-cap formats. If the project changes the closure family itself—for example from a screw cap to a press closure, pump, or trigger—review the separate guide to bottle capping machine setup for different closure types, where feeding, engagement method, tube handling, and orientation are compared in more detail.
A practical format matrix can record:
- Bottle: height, body shape, neck position, shoulder profile, base stability, and wall rigidity.
- Cap: closure style, outside size, height, gripping surface, orientation requirement, and feeding behavior.
- Bottle control: guide reference, holding position, and any dedicated support component.
- Cap control: feeding arrangement, chute setup, escapement, and placement reference.
- Capping setup: contact location, tooling position, vertical reference, and timing reference.
- Change parts: components that must be physically replaced rather than adjusted.
Know what usually changes first
Bottle and cap changes should not trigger the same adjustment sequence. A bottle-height change normally directs attention toward neck level and vertical relationships. A cap-diameter change, by contrast, is more likely to affect feeding clearance and the tightening contact area.
| Format Change | Check First | Likely Changeover Areas |
|---|---|---|
| Bottle height changes | Neck and top-of-bottle position | Placement height, capping height, holding level |
| Bottle width or shape changes | Container stability through the capping zone | Guide rails, holding contact, support or orientation |
| Cap outside size changes | Feeding and tightening contact | Chute, escapement, placement and wheel/tooling position |
| Cap height or profile changes | Clearance around the complete closure | Placement level, chute clearance, tooling contact |
| Bottle and cap both change | Bottle-cap relationship as a complete format | Holding, feeding, centerline, timing and change parts |
Separate adjustment-only formats from change-part formats
One SKU may only need guide, height, and chute adjustments. Another may require a dedicated guide, cap-handling component, bottle support, or tightening tool. Marking that difference in the format matrix prevents a production stop from becoming a search for parts that should already have been identified.
Mechanical reach alone does not prove compatibility. A guide may open far enough for a wider bottle yet stop supporting the shoulder correctly. Likewise, a tightening component can reach a larger closure while touching an unsuitable surface.
Adjustment or change part?
Keep the format as an adjustment when the existing components provide correct geometry, useful clearance, and repeatable control. If the setting reaches a limit, loses support quality, interferes with the package, or requires the same improvised correction every time, a dedicated change part deserves review.
Conveyor, Guide Rails and Bottle Holding
Many apparent capping faults begin with bottle control. A cap may seem to arrive off-center even when the chute is correctly positioned. In practice, the bottle neck may already have moved because the container leaned, rotated, or compressed before reaching the placement point.
Bottle travel should therefore be stable before detailed cap adjustments begin. Watch the package from conveyor entry through placement, tightening, and discharge. A stationary sample cannot show how the bottle reacts once guides, holding devices, and capping forces act together.
Set support before squeezing the bottle with guides
Guide rails need enough control to keep the neck on a repeatable path, but tighter is not automatically better. Excessive side pressure can deform a flexible container or increase drag. Too much clearance creates the opposite problem because the neck can wander just as the closure is released.
The movement pattern usually reveals where to look. If a bottle enters straight and only begins leaning near the capping zone, the fault is local. If the neck wanders from the entry point onward, the upstream guide relationship should be corrected before the cap-placement position is changed.
Watch bottle position at five moments:
- before the bottle enters the capping zone;
- directly below the cap-placement point;
- at the first tightening contact;
- during the main tightening action;
- while the finished bottle leaves the station.
Check bottle holding under real capping load
A bottle may sit perfectly centered while the capping mechanism is disengaged. Once tightening begins, the same package can rotate inside the guides. Flexible sidewalls may also move inward as a holding belt, pad, or other support begins applying pressure.
Judge final holding positions during actual engagement. Stable control means the bottle stays centered without obvious rotation, unwanted deformation, surface marking, or difficulty leaving the station.
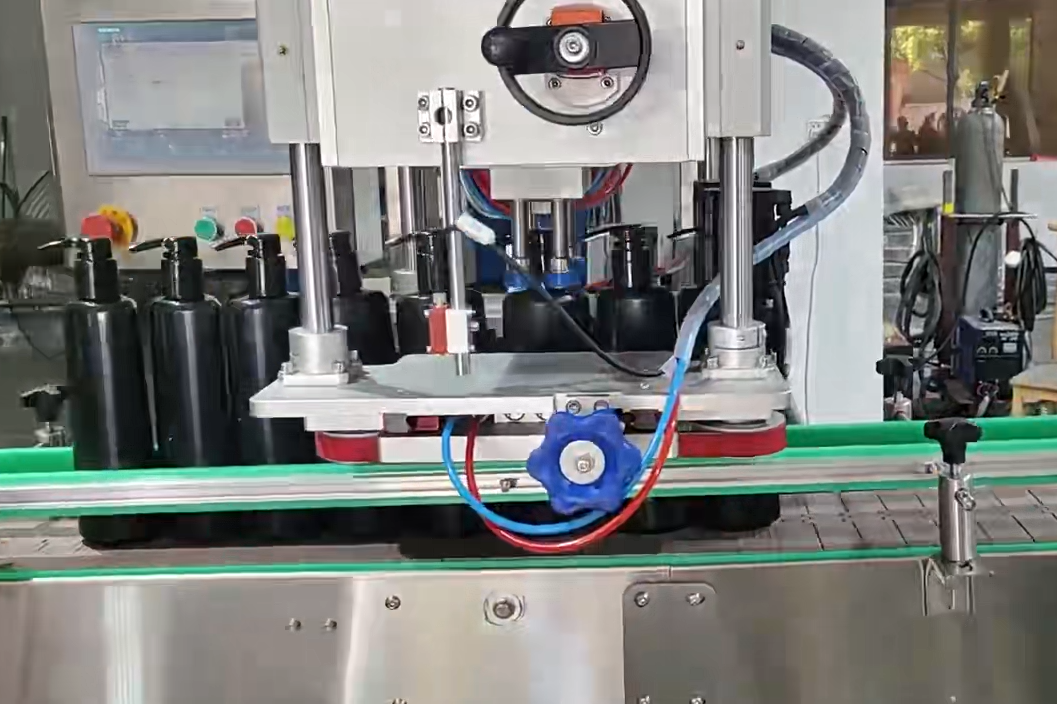
Bottle support, neck position, closure seating, and tightening contact should be reviewed together during a format change rather than as isolated settings.
Treat unusual bottle shapes as independent formats
Round, square, oval, handled, and offset-neck containers do not create the same handling problem. Even when overall dimensions are similar, their natural contact points can differ. Copying one guide setting to another bottle shape can therefore produce instability that only appears when the closure is engaged.
When bottle movement and cap engagement require a different working relationship, a follow-up type capping machine can be reviewed as another configuration path. Physical samples remain important because real bottle stiffness and contact behavior are difficult to predict from dimensions alone.
Cap Feeding / Chute / Placement Changes
Once bottle movement is repeatable, attention can move to the closure. A cap size change affects more than chute width. It can change how caps orient, stack against one another, pass transition points, enter the escapement, and finally reach the bottle neck.
One common mistake is adjusting the placement point when the actual fault sits higher in the feed path. A closure may pause briefly at one transition and create a gap in the queue. Several seconds later, the placement station appears to miss a bottle even though its setting has not changed.
Follow the closure from sorting to release
Watch for the first location where cap movement becomes irregular. If closures leave the feeder correctly but rotate in the chute, adjusting the feeder again will not address the first failure. Likewise, a cap that reaches the escapement in the wrong orientation already has a problem before tightening begins.
Check the cap path in this order:
- Stable entry into the cap-feeding route.
- Correct orientation before chute transfer.
- Smooth travel through chute transitions.
- One controlled closure at the escapement or release point.
- Release when the bottle neck reaches the placement position.
- Stable seating before the tightening mechanism takes control.
Use the visible failure pattern to choose the next check
Different symptoms point to different stages. A cap that never reaches the bottle suggests a feeding or release problem. A closure that reaches the neck but sits diagonally directs attention toward placement geometry, bottle centerline, or the approach path.
Consistency adds another clue. If each closure tilts in the same direction, look for a repeatable mechanical offset. If the angle changes from bottle to bottle, irregular bottle movement or unstable cap presentation becomes more likely.
Typical changeover clues
- Cap falls early: review release position and bottle arrival.
- Cap lands to one side: compare chute center with neck center.
- Cap supply becomes irregular: move upstream and inspect feed continuity.
- Two caps try to release: inspect singulation or escapement control.
- Cap reaches the neck but will not remain seated: review placement height, approach angle, and bottle movement.
Test the cap path as a queue, not one piece at a time
A single cap can often be pushed through a chute that becomes unreliable during continuous feeding. When several closures are touching, the queue introduces pressure, contact, and orientation effects that do not appear during a one-cap manual check.
Watch several consecutive closures before approving a new chute setting. One cap fitting through the path is not enough; the next closure also needs to arrive in the same orientation and position repeatedly.
Capping Head, Wheel or Tooling Adjustments
Tightening adjustments should come after bottle handling and cap placement are stable. Otherwise, added pressure or another tooling position can hide the symptom without correcting its source. The same workaround may later produce bottle rotation, cap marking, or poor repeatability after the next changeover.
The main question is where the installed mechanism should contact the new closure. A larger cap does not automatically mean the same component can simply move outward. Ribs, taper, dispensing features, and cap height may move the usable engagement area to another part of the closure.
Observe the first contact, not only the finished cap
A closure can enter the tightening zone correctly and shift at the first mechanical contact. Later wheels or tooling may then continue tightening a cap that is already misaligned. Watching only the finished package makes the first failure easy to miss.
For suitable wheel-based applications, the 4 wheels capping machine category provides a relevant comparison path. Final suitability still depends on bottle stability, closure profile, placement method, and representative samples.
Check clearance around the complete closure
Closure diameter alone does not describe the full space needed during capping. Pump heads, trigger bodies, spouts, decorative shapes, and other projections may pass close to nearby tooling as the package moves.
Follow the whole closure envelope through the working zone. A component can clear the cap while the machine is stopped yet interfere once the bottle moves or the closure changes orientation.
Change parts deserve review when:
- the existing component cannot reach the correct working position;
- the contact area no longer matches the closure profile;
- bottle or cap features interfere with the current tooling;
- the final adjustment sits too close to the mechanical limit;
- the same format needs repeated manual correction after every changeover.
Do not use extra pressure to repair poor placement
When a cap does not sit correctly, increasing tightening pressure can make one sample appear better. That approach can also create another fault by rotating the bottle, deforming a flexible closure, or hiding the original alignment problem.
Trace the cap back to the first point where its position changes. Placement should be stable before the tightening mechanism is expected to complete the closure engagement.
Bottle Capping Machine Height, Centerline and Timing Checks
Bottle height is only the starting reference. The more useful relationship is between the bottle neck, cap-placement point, holding level, and tightening mechanism. Two containers can have similar overall height while presenting the neck at different working positions.
Establish centerline before fine timing changes begin. If the closure and neck do not meet at the correct physical position, changing timing simply moves the same geometry error earlier or later.
Change one relationship at a time
When guide position, chute height, tooling contact, and timing all change together, the next trial provides very little diagnostic information. A more controlled sequence stabilizes bottle travel first, then cap feed, placement, tightening contact, and finally timing.
A clean adjustment sequence
- Center the bottle neck through the working zone.
- Align the cap-placement path with the neck centerline.
- Confirm that the closure remains seated before tightening.
- Set tightening contact around the actual cap profile.
- Check bottle arrival against cap release.
- Repeat the observation during continuous bottle flow.
Recheck centerline after tightening begins
This second check catches a problem that static setup often misses. The bottle can remain centered below the placement point and then move sideways when the capping mechanism starts loading the closure. Guide positions that looked correct during setup may therefore need refinement once the full cycle is running.
Tracking-style equipment also shows why motion should be judged dynamically. The key relationship is how the capping head, bottle, and conveyor behave while the package moves, rather than whether one stationary bottle can be positioned correctly.
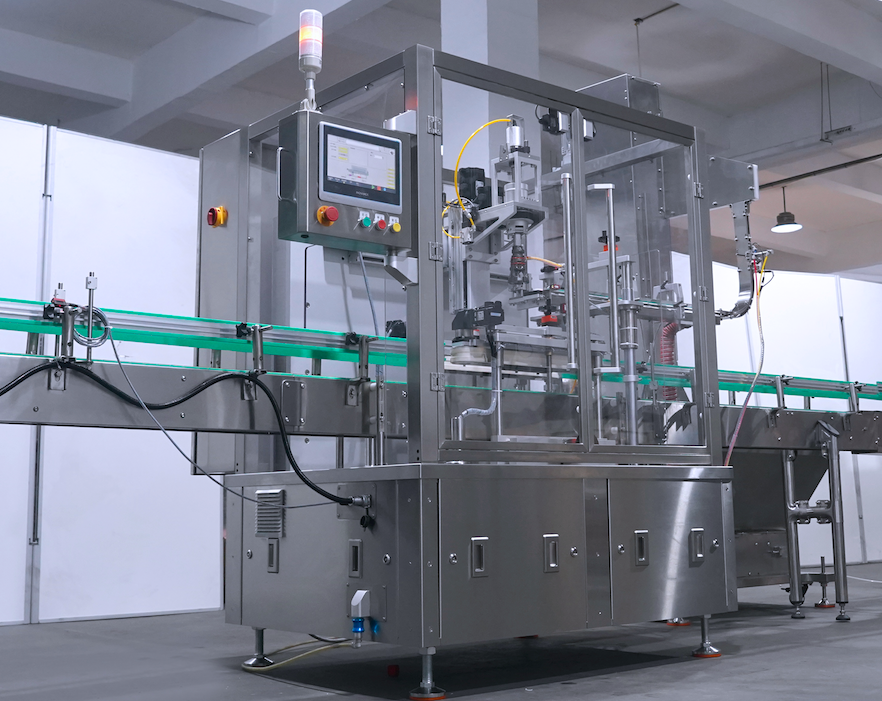
Tracking-style capping should be evaluated through the moving relationship between conveyor travel, bottle position, closure placement, and capping-head engagement.
Validate the New Bottle-and-Cap Format Against the Approved Reference
A changeover trial works best when the new format is compared with a known approved reference instead of being treated as a completely new machine setup. Note which positions, parts, or timing references changed from the previous SKU, then introduce operating variables in stages. This keeps the trial focused on what the format change actually disturbed.
For detailed screw-cap setup logic such as bottle holding, thread start, tightening acceptance, and torque-related checks, use the automatic capping machine setup guide. The sequence below is narrower: it verifies whether the documented change from one bottle-cap format to another remains repeatable in real operation.
1. Empty bottles only
Check conveyor support, guide position, holding, neck centerline, and discharge using the new bottle format. Bottle lean or rotation found here belongs to container handling rather than cap feeding.
2. Cap feeding and release
Run the new closure as a queue rather than one piece at a time. Watch orientation, chute travel, singulation, and release consistency, especially at any point where clearance or a cap-handling component changed from the previous format.
3. Empty bottles with cap placement
Confirm that each closure reaches the new bottle neck centrally and remains seated. Compare the result with the approved placement reference; tightening should not be used to force visibly poor placement into position.
4. Empty bottles with full capping action
Watch for bottle rotation, wall compression, cap movement, or tooling contact that appears only after the new capping position is engaged. This is where an adjustment that looked acceptable while jogging may reveal that the format needs a different support or contact part.
5. Representative filled bottles
Confirm the new format under realistic working conditions. Added product mass and changed wall behavior can affect bottle movement, resistance to rotation, and discharge stability, so final approval should reflect the package that will actually run in production.
Compare the new format with the previous approved setup
- Common: which guides, holding components, feeder parts, sensors, or capping tools remain unchanged?
- Adjusted: which installed components move to a documented position for the new bottle or cap?
- Dedicated: which parts must be removed and replaced because the geometry no longer stays controlled?
- Restart: does the first group of packages remain acceptable after a routine stop and restart?
- Return: when the previous SKU comes back, can the machine return to its approved reference without undocumented fine adjustment?
Do not approve the changeover from one perfect bottle
One carefully selected package can make an unstable changeover look acceptable. Consecutive bottle observation matters because feed continuity, bottle spacing, repeated cap placement, tightening behavior, and discharge only become clear once several packages move through the station together.
Where representative packaging samples are available, include pieces from different parts of the sample batch. The aim is not to redefine component tolerances. It is to avoid building the new format around one bottle or cap that happens to be unusually easy to run.
Check whether the fault follows the package
Watch what happens on the next few samples before changing another machine setting. If the problem stays at the same station position across different bottles and caps, the changeover setup deserves attention. If one particular component repeatedly fails while the others pass, inspect that bottle or closure first.
This comparison prevents unnecessary adjustments. A damaged cap, distorted neck, unstable bottle base, or other packaging variation can create a symptom that looks very similar to a poor machine setting.
Repeat the relevant stage after a major correction
A substantial upstream change can alter several downstream relationships. Moving a chute, for example, may change the cap approach and the point where the bottle receives the closure. Continuing with later checks without revalidating placement can hide the effect of that correction.
Return to the earliest stage affected by the change, confirm it again, and then move forward. This keeps the changeover trial diagnostic rather than turning it into a simple start-up checklist.
Include stop-and-restart and return-to-format checks
A format that runs well only after extended manual tuning is not yet a repeatable changeover. After the new format is stable, include a normal stop and restart and inspect the first consecutive packages. If the production plan regularly returns to the previous SKU, switching back to its stored reference is an equally useful test.
The goal is not to force every plant into the same changeover-time target. It is to prove that the recorded positions and installed parts are good enough to reproduce the approved condition without relying on undocumented operator memory.
Changeover Sign-Off Record
A successful format change is not finished when the first acceptable bottle leaves the machine. The final task is to capture enough information for the same package to return without another round of trial-and-error adjustment.
Record the settings that actually moved and the components that were physically replaced. Also keep observations that can shorten troubleshooting during the next run, especially when one format has a known sensitivity.
Record the format-to-format difference after the successful trial:
- Previous approved format: bottle reference, cap reference, and stored setup reference.
- New approved format: bottle reference and cap reference.
- Common / adjusted / dedicated: classify each major guide, holder, cap-handling component, and capping tool.
- Guide and bottle-holding positions.
- Cap-feeder, chute, escapement, and placement setup.
- Capping head, wheel, or tooling position.
- Height, centerline, timing, and sensor references that changed.
- Installed and removed change parts, including part identification where available.
- Filled-bottle, consecutive-run, and stop/restart trial status.
- Any repeatable fault pattern, special setup caution, or undocumented correction that still needs engineering review.
Write observations that can be used later
“Capper adjusted” provides almost no value during the next production run. A note such as “bottle rotates at first tightening contact,” “cap queue pauses before escapement,” or “neck shifts left as holding engages” points directly toward the condition that needs checking.
Photographs can support the record when change parts have several possible orientations. Still, an image should support an identifiable setting rather than replace it. Camera angle cannot reliably show exact clearance, contact pressure, or centerline position.
Treat repeated corrections as engineering information
If the same SKU requires the same correction every time it returns, the issue is no longer a one-off adjustment. The stored reference may be outdated, a format part may be wearing, or the chosen setup point may not be repeatable enough.
That pattern deserves a review of the baseline rather than another informal note. Over time, the changeover record should show which formats are genuinely easy to adjust and which repeatedly push the current configuration toward a mechanical limit.
Use the record before the next production stop
The sign-off sheet also becomes a preparation tool. Before a scheduled format change, the required guides, cap-handling components, tooling, bottles, and closure samples can be staged from the approved record.
That preparation separates unavoidable mechanical work from avoidable searching and uncertainty. It also gives the operator a clear starting configuration before the first trial bottle reaches the capping station.
Send the Current and Next Format for a Changeover Review
A useful changeover review starts with the two formats that must share the capping station. Instead of sending only the new bottle size or a target cap diameter, show what runs now, what must run next, which parts already change, and where operators currently lose time or stability.
Physical samples remain the strongest evidence because bottle stiffness, cap orientation, shoulder clearance, real gripping surfaces, and queue behavior are difficult to judge from dimensions alone. When samples are not available yet, dimensioned bottle and cap drawings can establish the first comparison.
Prepare this changeover package before requesting a configuration review:
- Current format: bottle, cap, existing machine model, approved setup reference, and any installed format parts.
- Next format: bottle and closure drawings or dimensions, neck position, overall profile, and representative physical samples where available.
- Change frequency: how often production moves between the two SKUs and whether the previous format must return regularly.
- Known difficulty: bottle rotation, cap-feed hesitation, off-center placement, tooling interference, slow manual correction, or another repeatable fault.
- Acceptance evidence: the required finished closure condition plus any consecutive-run, filled-bottle, restart, or return-to-format checks used by the plant.
With those inputs, the review can separate what should remain common, what can be handled by documented adjustment, and what may need a dedicated guide, bottle support, cap-handling component, tightening tool, or another capping configuration.
| Submit Current & Next Format Data → | Review Capping Options → |
Frequently Asked Questions
Which capping settings usually change when bottle size changes?
Bottle-size changes often affect guide position, bottle holding, neck centerline, vertical setup, and clearance around the capping zone. The exact change depends on geometry rather than height or width alone. Shoulder profile, base stability, neck position, and bottle stiffness can create different handling requirements.
When should capper changeover use physical change parts?
Change parts deserve review when existing hardware cannot maintain reliable bottle support, cap feeding, placement, clearance, or tightening contact across the new format. Reaching the required position is not enough. The final setup should retain useful adjustment margin and remain repeatable during consecutive operation.
Can two bottle-and-cap formats share the same capping settings?
Sometimes, but similar outside dimensions do not prove that one approved setting fits both formats. Compare neck position, bottle stability, cap profile, feeding clearance, placement geometry, and tightening contact. If the same hardware controls both packages without losing useful clearance or repeatability, the format can remain common or adjustment-based. If operators repeatedly compensate for poor support or contact, treat that as evidence that a dedicated reference or change part is needed.
What should be checked after switching back to a previously approved SKU?
Return the machine to the stored guide, holding, cap-feed, placement, tooling, height, and timing references, reinstall the recorded format parts, and inspect the first consecutive packages after restart. If the previous SKU still needs undocumented fine adjustment, update the changeover record and investigate whether the reference, tooling condition, or mechanical repeatability has changed.
How can frequent bottle and cap size changeovers become more repeatable?
Build one controlled format matrix and store approved setup references instead of relying on memory. Classify the major stations as common, adjusted, or dedicated, stage required change parts before the line stops, and verify the first consecutive packages after each change. For frequently repeated SKUs, include a return-to-format check so the stored reference is proven rather than assumed.